lovelybike3

  • Subscribe to our RSS feed.
  • Twitter
  • StumbleUpon
  • Reddit
  • Facebook
  • Digg
Showing posts with label grips. Show all posts

Thursday, October 15, 2009

More Glove Love: Convertible Mittens

Posted on 7:28 AM by dvdsvdsdv
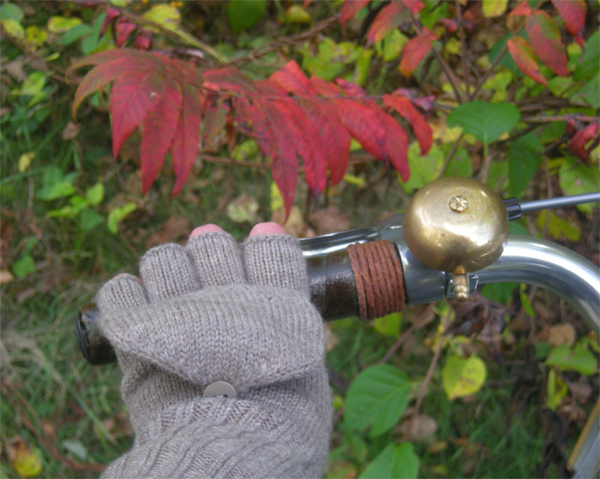
With the arrival of colder temperatures, my crochet cycling gloves were no longer cutting it. The Co-Habitant came to the rescue with a welcome gift: convertible mittens in a luxuriously soft wool. I love these things!

The convertible mittens are basically fingerless gloves, with extra "mitten flaps" above the knuckles. The flaps can be unbuttoned and folded over the fingers to create mittens. The thumb is full-fingered. The Co-Habitant bought these at the Banana Republic outlet store. They were available in this heathery beige colour, and also in black. Apparently many mainstream apparel manufacturers now sell versions of these.

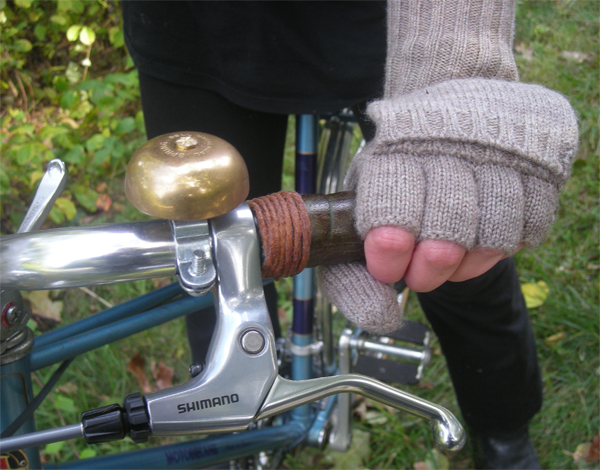
Aside from being clever and cute, these convertible mittens have several features that make them particularly suitable for cycling. Having the tips of the fingers exposed allows for optimal shifting, braking, and other machinations (such as camera clicks) that do not work so well when the finger tips are covered. The mitten mode makes them versatile as on/off the bike gloves. The 100% wool is great for warmth and moisture-wicking, and is not slippery on the handlebar grips.

An additional benefit, is that these gloves are extra long, which is excellent for protecting cyclists' wrists when they get exposed to the cold air due to the stretching of the arms to reach the handlebars. All those jackets, coats and sweaters with sleeves not long enough for cycling can be supplemented with long gloves like these.

Convertible mittens in action. For those of you who knit, this might make a fun and worthwhile project (see instructions in pdf). Just make sure to use a soft 100% wool yarn (or wool and silk blend) and not an acrylic blend, and to make them extra long.
Read More
Posted in Boston, clothing, grips, Marianne, Motobecane | No comments

Friday, September 4, 2009

Dressed Up and Ready to Go

Posted on 6:17 AM by dvdsvdsdv
Marianne's new handlebars are now wrapped, twined and shellacked. You can see that the bars do not look quite so wide and wing-like once they have been wrapped.

The hand position is similar to a classic mountain bike position - but achieved more elegantly. I feel that I have a lot more control with these bars than I did with the drops, and now cycling in traffic on this bicycle is no longer an issue - even though I am not any more upright now than I was when I had my hands on top of the drop bars. This must mean that the fear I previously had of riding the bike in traffic had more to do with balancing and braking than with being hunched over.

From a utilitarian standpoint, the best thing about the new set-up are the brakes. The new Shimano levers have made them the best functioning brakes I have on any of my bicycles. I cycled all around town and on some trails yesterday, and the experience of riding this bike has been completely transformed for the better. I am so thankful to Open Bicycle in Somerville, Mass. for the wonderful job they did on this. They did not just replace parts, but worked with me to "troubleshoot" and design the new set-up based on the problems I was having with the old one. Those guys know what they are doing.
Read More
Posted in grips, Marianne, mixte, Motobecane, vintage | No comments

Saturday, August 15, 2009

Adventures with Twine

Posted on 7:44 AM by dvdsvdsdv
The most typical use of twine on a bicycle, is to secure the inner edges of handlebar tape. Normally, bar tape is secured with black electrical tape and left as is, but I find that this looks unfinished. With twine, the handlebars will look more appealing and the tape will be more securely attached.

I use cooking twine, which is softer to the touch than industrial twine. It is white in its untreated state and turns caramel-brown when amber shellac is applied.

After wrapping your bar tape and securing the inner edges with electrical tape, the twining can begin.

First apply a layer of clear double-sided tape over the electrical tape.

Cut a half-armlength of twine.

Apply the twine over the double-sided tape by simply wrapping it around the handlebar and placing it down neatly onto the sticky surface of the tape. There should be no gaps and no overlap.

When the surface of the double-sided tape is covered with twine, cut the remainder off. There is no need to secure the twine, since it is stuck to the double-sided tape. This will provide a good temporary hold until shellac is applied.

Using a paintbrush or a sponge brush, cover the twined area with amber shellac following the same principles described here.

After three layers of shellac, the twine should feel completely solid and have a deep amber colour to it, at which point the project is finished. Your bar tape will be more secure than ever and will look great.

If you've finished twining your bars and still crave more, do not despair: There are lots of other places on a bicycle where twine can be used. I twined the chrome connector piece between the rack and the rear stays on my Pashley, because I was not satisfied with how the expanse of chrome stood out in an otherwise green and black colour-scheme. The dark amber twine softened that area up, and integrated it nicely with the wicker basket, brown leather saddle, and handlebar grips.

Here is a close-up of the twined rack connector. I thought that this was a failry subtle detail, but to my surprise, several people commented on it while examining my bicycle.

My most daring use of twine thus far, has been the twining of my Shimano Nexus shifter. My reasons for doing this were two-fold: I thought that the big rubber shifter was too modern for the aesthetic of the Pashley's handlebars, and I also found it unpleasant to the touch, especially in the sumemr heat. Covered with shellacked twine, the shifter blends in better and is more comfortable for me to use, as the twine provides a better grip than the rubber. There was some concern regarding whether the twine would adhere well to the rubber, but this was not an issue; just wrap it tightly prior to shellacking.

Of course, once you do this to your shifter, there is no going back: the shellac will disfigure the rubber if you ever decide to remove the twine and you will need to buy a new one. Twine at your own risk!

For more twining ideas, Rivendell has some nice pictures and instructions, as well as hemp twine for sale. Also have a look at this marvelous twined water-bottle pictured on The Epicurean Cyclist.
Read More
Posted in DIY, grips | No comments

Friday, July 3, 2009

Adventures with Shellac: Olive Handlebar Tape

Posted on 3:58 AM by dvdsvdsdv
Okay: So say, hypothetically, you acquire a Mixte. It is a beautiful pale marine-blue. And it comes with drop handlebars. And after reading an article by Sheldon Brown, you decide to give the drop bars a try rather than immediately replace them. Now, keeping this entirely hypothetical scenario in mind, what kind of tape would you get for said dropbars, if the awful rubbery stuff they are covered with will not do?

It is surprisingly tricky to complement pale marine-blue. I think that black deadens the colour, but brown tape can have a look of medical bandages to it that I don't like.

[image from rivbike.com]

Inspired by the above picture from Rivendell, I thought that olive tape would look perfect. It is a neutral colour that seems to tie together the blue frame with the brown saddle and accessories. And it has a classic touring look to it, evoking images of the countryside.

Olive handlebar tape is pretty much impossible to find. But colour-theory tells us, that applying amber shellac to standard green tape would be akin to mixing brown into green, producing an olive drab colour. Let's hope it works out that way!

Dreadful rubberized wraps after surgical removal. Ewww!

Naked handlebar. Mmmm!

Handlebar wrapped in green Tressostar Cloth Tape. This is a standard green, looks very Christmasy. Definitely not the colour we hoped to end up with, but we have faith in colour theory. I should mention, that of course it was the Co-Habitant who did all the work, since I am still in Europe. He tells me that wrapping handlebar tape is not the easiest thing to do. So this project is definitely one step up from cork grip installation.

And now, voila: The green tape covered with amber shellac. This is what it looks like before the shellac sinks into the cloth and dries. I posted the above pic on bikeforums in response to someone's question about shellacking green tape, and the nice people there promptly told me that my tape looks like sh!1 : )

Here is the colour after it soaks in a bit. It becomes a true olive drab, exactly what I wanted. Hurray for colour theory! (Oh and that enormous reflector will soon be gone.)

Of course, this is all entirely hypothetical. Mixte? What Mixte!
Read More
Posted in DIY, grips, mixte, Motobecane, vintage | No comments

Wednesday, June 24, 2009

Adventures with Shellac: Cork Grip Yumminess!

Posted on 1:18 AM by dvdsvdsdv
If you love the rich butterscotch look of shellacked cork grips, but are worried about the DIY factor, fear no more. We gave it a shot, and it really is quite easy. Here we go:

Rodney the vintage Roadster came with these original Raleigh black grips. Although they look nice and we like to keep original parts, neither of us can stand the feel of plastic grips. So we decided to experiment with cork. Rivendell makes it seem so simple and fun!

Well, here is a "naked" cork grip. So far so good! The Co-Habitant secured the grips with strong double-sided tape, but most recommend to glue the grips. He rode the bike with the unshellacked grips for a while to see what this felt like. The unfinished grips feel good, but they get dirty very easily and are not protected from the elements. We wouldn't want ratty, filthy grips. Plus the colour needs some spicing up.

Here comes the shellac. Amber. This is from the hardware store, nothing fancy. Generic 1" paintbrush.

Here the first coat of shellac is being applied. This stuff is fast drying, so the work should be done fairly quickly.

Second coat of shellac. As you apply 2-3 thin coats, you will see the colour gradually grow darker, richer, and warmer. Uneven patches on the surface get smoothed out. Three thin coats should be enough, and you can always touch it up if you notice some unevenness later.

We decided not to add twine or tape to these grips, but to keep things clean and minimalist on the vintage black Roadster. The first photo in this post is the final result!
Read More
Posted in DIY, grips, Raleigh, Rodney, vintage | No comments

Tuesday, June 23, 2009

Rodney, the Distinguished Older Gentleman

Posted on 10:14 AM by dvdsvdsdv
Though I was very happy to reclaim the Raleigh Lady's Sports from my parents' house, doing so created a distinct velo disbalance betwen myself and the Co-Habitant. Clearly my Lady needed a Gentleman. Well, with New England being Vintage Bicycle Heaven, it did not take long for the right Gentleman to come along.

Meet Rodney, the Raleigh Roadster! According to the date on the hub, he was produced in 1972.

Rodney is a tall gentleman, with a 24" frame and 28" wheels. The Co-Habitant likes big bikes, and one of the reasons he chose the Roadster over the Sport is the larger frame size and wheels.


Original Sturmey-Archer 3-speed hub. Like all Raleigh Roadsters, this one has rod brakes. They look wonderful and are simple to maintain. But rod brakes make me uneasy, because they have close to zero stopping power in the rain.

The original Raleigh grips have been replaced with cork grips, which will soon be shellacked. A Japanese bell was added.

The Brooks B72 saddle had hardened with age, but it has now been treated and laced. The bicycle itself was in great shape. No parts needed to be replaced. Cosmetically Rodney looks excellent. The vintage black saddlebag was included in the purchase. CatEye Opticube LED Bike Light have been added (see front wheel).

The Co-Habitant says that the vintage Raleigh Roadster feels considerably lighter and "sportier" than his Pashley Roadster Sovereign. The Pashley, however, is a more comfortable ride (and can be safely ridden in the rain).

What a gorgeous pair of Roasters he now has, old and new! And the velo-balance in our household has been restored.
Read More
Posted in Brooks, Co-Habitant, diamond frame, grips, Raleigh, restoration, rod brakes, Rodney, vintage | No comments

Wednesday, June 10, 2009

Roadster in the Rain

Posted on 10:04 AM by dvdsvdsdv
My Co-Habitant never tires of tantalising me with photos of his Pashley Roadster, while I suffer here alone and bicycle-less in distant lands. Here are some close-up shots in the rain...

Oh how the raindrops do glisten on that chrome ding-dong bell...

and on the Sturmey Archer 5-speed hub...

and on the Brooks Glenbrook bag...

Brooks saddles come with this convenient rain cover. Don't know whether I think they look cool or perverse! Either way, I am completely envious.

Read More
Posted in Brooks, diamond frame, grips, Pashley, rain | No comments

Tuesday, May 26, 2009

His Pashley Roadster Arrives!

Posted on 2:26 PM by dvdsvdsdv

[edited to add: There is now a review of this bicycle here.]

The end result of our frenzied search, was that both my darling Co-Habitant and I decided to buy Pashleys: he the Roadster Sovereign (which comes only in black), and I the Princess Sovereign in green. My Princess is getting some custom work done at Harris Cyclery (a coaster brake installed) and will be waiting for me when I return from Vienna. The Co-Habitant's Sovereign arrived last week and he has been enjoying it ever since. Lucky, lucky him!


My dandified Co-Habitant added Brooks leather grips and bags to the bike, but everything else pictured here came standard. This is an enormous bicycle and he absolutely towers over the traffic as he rides to work. I can't wait to see him ride it in person, and to pick up my Princess!


The saddle that comes with the Roadster is the Brooks B33 in black. The bags are the Millbrook and Glenbrook. The leather grips in black are pictured here. All of these are available at Harris Cyclery in West Newton, Mass.
Read More
Posted in Brooks, Co-Habitant, diamond frame, dress guards, grips, Pashley | No comments
Older Posts Home
Subscribe to: Posts (Atom)

Popular Posts

  • Profiles of Traditional Bicycle Manufacturers
    {This post is now a Page }
  • Review of "Marianne": Motobecane Mirage Mixte
    I. THE BICYCLE: Marianne is a 1981 Motobecane Mirage Mixte in a shimmery aquamarine colour. She is a 21" frame, 12-speed, with original...
  • New Year, New Look, and Change of Contact Info
    Happy 2010 everyone! It's always nice to do something new in the new year, and so you may have noticed that I've made some minor cha...
  • DZnuts for the Ladies?
    One discovery I have made in my attempts to battle roadbike discomforts is a product called DZnuts . This is a chamois cream that promises t...
  • Critical Mass Chic? -- Austria
    I stopped by at the meeting point of the Critical Mass "Bare as You Dare" bike ride in Vienna today. There was a conference at wor...
  • Idyllic Trail Through the Charles River Reservation
    When most people ride on the Charles River trail, they keep to the popular loop around Boston and Cambridge. However, the trail goes on (and...
  • Creative Encounters: Bicycle "Self-help" Workshop
    Located in the WUK center for workshops and culture in Vienna, the Fahrrad Selbsthilfe Werkstatt (Bicycle Self-Help Workshop), functions o...
  • Can We "Ride Away" from Marketing?
    [image from goldenoldy.com] An article appeared today on Copenhagen Cycle Chic  discussing the ironies of advertising "cycle chic"...
  • Netted Dress Guards
    I love the look of netted dress guards, so while I am in the EU, I decided to stock up. Here are some lovely options from reliable online se...
  • Bicycles in Vienna, Part IV: Mixte Galore
    Continuing with the theme of the previous post, I am showing off some Mixtes that I've been encountering around the neighborhood. After ...

Categories

  • ANT
  • art
  • bags
  • basket
  • beginners
  • bicycle events
  • bicycle industry
  • bicycle reviews
  • bike friends
  • bike shopping
  • blog development
  • Boston
  • Brompton
  • Brooks
  • Cape Cod
  • cats
  • clothing
  • Co-Habitant
  • coaster brake
  • comfort
  • countryside
  • diamond frame
  • DIY
  • DL-1
  • dress guards
  • drop bars
  • Eustacia Vye
  • fashion industry
  • fenders
  • films
  • flowers
  • food
  • framebuilding
  • Gazelle
  • gender
  • give-away
  • grips
  • handlebars
  • holidays
  • Italian bicycles
  • lights
  • local bike shops
  • loop frame
  • Lucy 3-Speed
  • lugs
  • Marianne
  • mixte
  • Motobecane
  • Myles
  • night time cycling
  • Pashley
  • product reviews
  • rain
  • Raleigh
  • restoration
  • Rivendell
  • roadcycling
  • rod brakes
  • Rodney
  • Royal H
  • Royal H. Mixte
  • saddles
  • shop visits
  • silliness
  • skirt
  • social commentary
  • somervillain
  • summer cycling
  • sun and heat
  • tandem
  • technique
  • test rides
  • tires
  • tools
  • traffic
  • trails
  • travel
  • urban cycling
  • Velouria
  • Vienna
  • vintage
  • winter cycling

Blog Archive

  • ▼  2010 (8)
    • ▼  January (8)
      • Review of "Spoke Count" at the Chorus Gallery
      • Say It Loud: We Like Them Plowed!
      • What's Green and Lugged and Not a Bicycle? An Unex...
      • Woolen Socks and Tights: Winter Cycling Delights
      • Fun in the Winter Sun
      • Little Green Bike: Trying the Raleigh Twenty
      • Parka Time?
      • New Year, New Look, and Change of Contact Info
  • ►  2009 (182)
    • ►  December (22)
    • ►  November (20)
    • ►  October (27)
    • ►  September (21)
    • ►  August (20)
    • ►  July (21)
    • ►  June (23)
    • ►  May (19)
    • ►  April (9)
Powered by Blogger.

About Me

dvdsvdsdv
View my complete profile